Showing posts with label FOOD EXPERIMENTS. Show all posts

Saturday, October 20, 2012

Double Chocolate Mousse Tart

Here's a quick blog entry before I proceed with finishing off everything else I need to do. So, I havent baked in a while. And because I bought a huge carton of whipped cream months ago with my own pocket money and didnt use it yet, I decided I couldnt let it go to waste. I always love mousse and making this was the epitome of my dream dessert.  

Got the recipe from taste.com.au and the initial recipe required a chocolate biscuit base. But because my mom had never tried a golden base before, I thought I would change it for her sake. Turned out pretty ok too, heh. 

I love the ganache layer... NEVER omit it out!


Double Chocolate Mousse Tart
Biscuit base:
250g digestive biscuits
125g butter, melted

Chocolate ganache:
100g dark chocolate, chopped
1/2 cup whipping cream

Chocolate mousse:
200g dark chocolate, chopped
1 tsp vanilla
600ml whipping cream
A pinch of gelatin

1. Grease a 9 inch round spring-form pan. Line base with baking paper. 
2. Place biscuits and flour in a processor. Process until finely chopped. 
3. Add butter. Process until combined. 
4. Press mixture evenly over base of prepared pan. 
5. Refrigerate for 30 minutes.
6. To make chocolate ganache, place chocolate and cream in a small saucepan over medium-low heat. Cook, stirring constantly, for 3 - 4 minutes or until smooth. Pour over biscuit base. Refrigerate for 30 minutes or until set.
7. To make chocolate mousse, place chocolate, vanilla and half the cream in a saucepan over medium-low heat. 
8. Cook, stirring constantly, for 3 to 4 minutes or until smooth. Remove from heat and let it cool for 15 minutes. 
9. Using an electric mixer, beat remaining cream until soft peaks form. 
10. Fold chocolate mixture into cream. 
11. Gently pour over ganache layer. Refrigerate overnight.


So that's all for today. My life is revolving very fast these few weeks. It's probably the fastest I ever have had to endure. But I will survive, just like I always do. 

Sunday, October 14, 2012

Waffles For A Day

Barely half of my day has passed and it has already been so fulfilling (though exhausting)! Last night, I downed god knows how many SMALL cups of Carlsberg beer with my buddies. But hey, that is not the highlight of my blog entry today!

BGF organised a Food and Fun Fair today at SJK Yuk Chai. The purpose of this event is to raise funds to build a new BGF centre at Ara Damansara, if i am not mistaken. There was a food section and fun section but of course, with my tendency to gravitate to food, I volunteered to help out with the food section. And that was the best decision I made today.

Met this man with the waffle machine so I asked him if he needed help to man his stall, in which he then taught me how to make waffles with the machine. OH YEAAA~ So I made waffles non-stop from 9am to like 3pm. And the response to the waffles were very good. He didnt just sell plain old waffles but also waffle sausages. Waffles with sausage on a stick. Those got a very good response from people. That man was actually a waffle equipment supplier or something like that.. but he nevertheless impressed me with his waffle-making skills as well as his good nature. He was very different from the usual traders in the sense that he was not too much of an opportunistic. He was very honest in his work and did not get pissed off when people made mistakes. There was even a kid who wanted to eat a waffle sausage when those ran out and he actually pursued the kid with a sausage. I found that very touching and nice of him.

So yea, there goes half my day. I still have a long way to go. Needa take a break for a while before going off for dinner with some friends. And there is my assignment to do. And my project paper. Oh and.. all those tutorials. OMG!  

Friday, July 27, 2012

Chocolate Mousse Cake

Well, life has been exhausting and busy for the past week. Working has lost its magic and right now, a job is JUST a job. Also learnt the value of money and shall resolve to not spend money like water from this day. I now know how to make most of the drinks in Starbucks (some, anyways) and have been posted as cashier four times. It is one hell of a job because you cant afford to make mistakes.


I baked a Chocolate Mousse cake last Wednesday. I love mousses and have always been meaning to make a mousse cake but my first attempt months back went awry because someone thought she could get away with not putting gelatin in the mousse *shifty eyes*. But hold your horses, this IS a chocolate mousse cake and I DID make it without any gelatin in the mousse! Having said that, this cake does require a lot of eggs. But it was all worth it in the end. 

The dark brown part is chocolate mousse while the lighter brown is chocolate sponge. I highly recommend the cake part because I am not very good with sponges and yet, this one turned out pretty awesome. The whole cake was light, spongy and fluffy. Nothing got overbaked or underbaked. Perfect-o! The mousse on the other hand, can be smoother and silkier. Perhaps I shall try a better brand of whipped cream the next time?


Chocolate Mousse Cake

A:
25g cocoa powder
75ml milk/water (Milk ran out, so I used water)
100g egg yolk
75 ml oil
90g high ratio flour (Substituted with sifted flour)
1/2 tsp baking powder

B:
120g egg whites
1/4 tsp cream of tartar (Omitted this altogether)
110g caster sugar

Chocolate mousse:
1 egg + 140g egg yolks (Put less yolk, more whites)
160g caster sugar, 40ml water (Sugar may be reduced to 130g)
500g dark chocolate, melted
600ml whipping cream

Chocolate coating:
100ml whipping cream
100ml water
160g caster sugar
100g piping jelly
45g cocoa powder
2 tsp gelatine (dissolved in 20ml water)

1. Preheat oven at 180C. Line a 9'' round cake tin with parchment paper.
2. To make cake batter, whisk together A until well-combined. Set aside.
3. In a separate bowl, whisk B until stiff peak. Combine A with B and pour into cake tin. Bake for 30 minutes. Allow cake to cool before cutting into two.
4. To prepare the mousse, whisk eggs until thick and glossy. At the same time, boil sugar and water until sugar is dissolved. Pour hot syrup into eggs in a steady stream while eggs are beaten. Set aside.
5. In another bowl, whisk cream until stiff peak. Fold 1/4 of cream into melted chocolate and fold back chocolate into remaining cream. Fold in egg mixture.
6. To prepare the chocolate coating, boil cream, water and sugar. Add in piping jelly. Stir in cocoa powder. Strain mixture. Add in gelatine mixture. Cool until slightly thickened before pouring over cake.
7. To assemble the cake, place first half of cake onto a into a 9'' loose-base tin. (I did not have one so I just put in on a cake pan and blocked the edge with parchment paper.) Spread 1/2 of the moussse. Repeat with second layer of cake and mousse. Chill. Spread chocolate coating. Chill before serving.


*note: If you happen to not have piping jelly (like me), you may make it yourself.

Piping jelly:
1/4 cup lemon juice
1 tablespoon corn flour
1/4 cup water
4 tablespoons caster sugar

Mix liquids and flour together. Boil. Add in sugar. The liquid will become jelly-like and translucent.

Wednesday, July 25, 2012

Rainbow Cake

A very very colourful post ahead! Well, yesterday was my first ever break since I got back from China and started work. To be honest, I have been tempted to bake all sorts of things in the past few months but never really had the time to sit down and research my stuff. Did two batches of macarons but it was a failure much. Will need to bake them again, until I succeed or my previously-acquired-macaron-baking-skill would go down the drain. Yesterday I did something just as colourful as macarons but.. in cake form - Rainbow cake! Got the recipe from Sweetapolita but made some slight alterations to the recipe. 

On another note, working does.. sometimes make me feel like a sore thumb. Not sure if it is because I am new to the working field or whether I really do have the IQ of a bird.. I seem to have a lot to learn. Keep making mistakes here and there. And working at Starbucks is a lot of pressure because customers expect a lot from us. Hopefully I will learn more quickly before everyone around me loses their patience with me. For now, they still can explain to customers that I am still new. But it will soon be one week. Then it will be two. Then what's next? 

* * *

My paint/batter/painted batter. 

Basic Rainbow Cake

226g butter
2 cups sugar
5 egg whites
2 teaspoons vanilla
3 cups flour
4 tsp baking powder
1/2 tsp salt
1 1/2 cup milk, room temperature
Red, yellow, blue gel food coloring

1. Preheat oven to 170C. Line the 9'' cake pans. 
2. Sift together flour, baking powder and salt. Set aside.
3. Cream butter and sugar until white and fluffy. Then add the egg whites bit by bit. Add vanilla. Then, add milk and flour mixture alternating. 
4. Divide the batter into 6 bowls. I used a ladle to uniform the amount scooped into each bowl.  
5. Mix in the food colouring into the bowls. To achieve orange, mix red and yellow food colouring in equal proportions. Likewise to achieve green colouring, use blue and yellow food colouring and to get violet, use blue and red food colouring. Ensure that colouring is mixed thoroughly into the batter. Any clumps will look awful when the cake is baked, so dont let this happen!
6. Pour into the pans and bake for 15 minutes each. 
7. When they are done, let them cool. Refrigerate them before stacking.   

Basic Buttercream (for filling)
1 cup butter
3/4 cup icing sugar
1 teaspoon vanilla

Cream butter until white and fluffy. Add in icing sugar and continue beating. Add in vanilla. 

Whipped Cream (for frosting)
2 cups whipped cream
2 teaspoon icing sugar
1 tsp vanilla

Ensure bowl and beater is chilled before beating. Beating until whipped cream is thick and fluffy.

Assemble
Place cake layer one by one alternating with buttercream filling. Crumbcoat the cake before decorating with whipped cream.


Monday, April 2, 2012

Chocolate Banana Cake (Secret Recipe Inspired!)

Thing have been going well for me, well.. at least for my baking. The Mud Pie I made a few days ago went well and then today, I attempted a Chocolate Banana Cake. I know I really should start studying. What with so many tests coming up after the holidays, and I can foresee the end of April to be super hectic and killing. But.. that is another story.


Chocolate Banana Cake

A:
30g cocoa powder, mixed with 120ml water
4 egg yolks
100g sugar *I reduced to 90g
130g SRF *didnt have SRF so I replaced it with all-purpose flour + 1 1/2 tsp baking soda + 1/4 tsp salt
1/2 tsp baking powder
1/2 tsp baking soda
60ml corn oil
1 tsp vanilla essence

B:
4 egg whites
60g sugar *reduced to 50g
1/4 tsp cream of tartar

Cake filling:
500ml chocolate whipping cream *I used normal whipping cream but added cocoa powder to the cream
1 tsp vanilla essence
1 1/2 tbsp instant coffee, mixed with 1 tbsp hot water *personally felt the coffee flavour was a little too strong but I guess it depends on the brand of coffee you use!
1 tbsp gelatine
6 ripen bananas, cut into slices of 1.5cm thickness

Chocolate topping:
(Note: I cut down the original recipe by half as these frosting recipes normally have extra so if you arent stingy, just double the portion and that will be the original recipe. Personally found the coating to harden quite quickly once poured onto the surface of the cake. Perhaps, a suggestion for myself in future is to add more whipping cream to the mixture so the topping will not be hard and instead, hopefully, will have a softer ganache-like texture.)
70ml whipping cream
175g cooking chocolate
1/2 tbsp butter

1. Preheat oven at 180C.
2. In a bowl, to perpare A, whisk egg yolks with cocoa mixture until thick and gooey. Gradually add sugar, flour, baking powder, baking soda, corn oil and vanilla essence. The end product should look chocolate-y and shiny but also very sticky.
3. To prepare B, whisk egg whites and cream of tartar until foamy. Add in sugar and continue whisking until stiff peak.
4. Fold A into B.
5. Pour into 9-inch cake pan and bake for 40minutes (*I baked it for 30minutes. Again, this depends on your own individual oven as each oven is different).
6. Let it cool. Invert cake and cut into three layers when cool.
7. For filling, whisk cream until stiff peak. Add in vanilla essence, followed by coffee mixture and gelatine mixture. I added in cocoa poweder too.
8. Spread filling onto first layer of cake and arrange banana slices on top of filling. Top with second layer. Spread filling and arrange slices of bananas. For the last layer, spread cream filling on top and side of cake. Leave in the fridge to set.
9. To prepare chocolate topping, heat chocolate in double-boiler and add in butter and whipped cream. Stir until mixture is smooth and melted. Leave to cool before pouring in top of cake.


 Doesnt it look like Secret Recipe's Chocolate Banana? :p
Well the next time I make this, I will try to improvise it and make it more original.. :)


Thursday, March 29, 2012

Mississippi Mud Pie - Accomplished!

Managed to complete my mini mud pie project over a span of 24 hours. As you can see in my previous post, I did attempt it a few days back but didnt quite complete the entire mud pie. So this time round, back with a vengeance, I was determined to do it right to the end. 

And.. here it is. Mississippi Mud Pie.  


Sunday, March 25, 2012

Half A Mississippi Mud Pie


I couldnt resist attempting to bake a mississippi mud pie, especially after seeing the caffeinated kitchen blog post about it. Theirs look so tempting I had to try to make it for myself!!!

But of course, spending my day baking as well as visiting the animal shelter yesterday, comes at a cost.. I ended up not doing the slightest bit of reading up on my books! I really REALLY need to start after lunch. Anyways, a few comments on the mud pie that I made.

Why I call it HALF a mississippi mud pie is because it is an unfinished work. I had only completed the oreo crust as well as the flourless chocolate cake (picture above) and my mom was in a hurry for me to serve it to everyone to try. She wasnt too keen on me making the pudding layer as it will just be more calories for my dad to consume. Lame but yea, true story. I promise the next time I bake this I wont just do the cake and the crust. I will complete it right to the very end. That asides, I got mostly positive feedback from my family. This is a very chocolate-y cake, suitable for chocolate lovers. Thick oreo crust with moist goeey chocolate with each bite. I can only imagine how heavenly it would taste if I went all the whole and made the complete mississipi mud pie. Dont worry, it will be real soon. ;)

On a different note, the cramps steathily crept in since last evening. First I felt the muscle cramps on my abdomen, then my back and when I woke up this morning, the entire 'cramping' process was complete. Thighs, hips, shoulders, you name it. Except (of all places!) my calf! Totally zomg. My mother thinks that I must be walking very fast on normal days to not experience cramps on my calf after yesterdays run. Lol, oh no laughing makes my abdominal muscles cramp.


Friday, March 9, 2012

Meat Cake

Wait. Does the title of this post makes you go all ewwwwww or do you sit up in delight?

As for me, when I stumbled upon the recipe for bacon brownies I was slightly disgusted but still I went on reading because the recipe did remind me of a friend who is particularly obsessed with meat. He always told me to bake a meat cake but I never took it seriously. I mean, meat? Dessert? It toally doesnt match man.. That was what I thought, until today.

Introducing.. beef brownies.

Initially, I was planning to try out the exact recipe. Bacon and all. I was so spirited to the extent that I got out of my house just to go shopping for the ingredients! Unfortunately, the place I went did not sell bacon (bacon being pork). They only had beef strips so I grabbed what I could grab and brought back home a packet of Beef Breakfast Streaky.

Immediately got to work! I was very enthusiastic. I could not possible fathom what meat would taste like with chocolate. But unfortunately all the while, I was thinking that the beef strips I had substituted for bacon was bacon itself. There IS a difference. The most glaring difference being that beef has a stronger smell than bacon. It's redder and leaner too. The other not so obvious difference is that all chinese can take pork but not all can take beef. So anyways, I went about with my brownies happily combining the ingredients and all.

Baked them and just when I was cutting the brownies, planning on who to give, my heart sinked with dismay upon the realisation that one of my closest friends would not be able to eat it because it is BEEF and not bacon!!! Beef is NOT bacon. Seriously, the whole hype of meat cakes got me so excited today that I conveniently categorised the both of them together. How sad.

Anyways, here is the recipe that I used. Adapted it rather quite dramatically (since bacon is NOT beef) from the recipe I got from 17 and Baking.

Beef Brownies

113g unsweetened chocolate, chopped
8 tablespoons of butter
1 1/2 cup sugar
1/4 tsp salt
2 tsp vanilla
1 cup flour
2 tablespoons of natural cocoa
5 strips of beef

1. Preheat the oven to 350F (177C). Grease a 8″x8″ pan and set in parchment paper, letting the two ends hang over the edge. This makes a “sling” that will make lifting the brownies out of the pan very easy. Grease the parchment.
2. Heat a large pan over medium heat. When hot, lay in the strips of bacon. You want them to be crispy. Let them cook on each side until sufficiently cooked, then transfer to a plate with several layers of paper towel. Once cool, cut or rip the bacon into bits about the size of your fingernail.
3. Place the chopped chocolate and the butter in a metal bowl, and set it over a pan of gently simmering water. Stir the mixture until the smooth and the chocolate has melted completely. Remove from the heat and let cool slightly, then whisk in the sugar, salt, and vanilla. Then add in the eggs, one at a time, stirring until smooth.
4. Sift in the flour and cocoa, and whisk to combine. Stir in the bacon bits.
5. Scrape the batter into the pan and smooth the top with a rubber spatula. Bake brownies 30-40 minutes, or until a toothpick inserted into the center comes out clean. Let the brownies cool in the pan for a few minutes, then use the parchment sling to lift the brownies out of the pan. Transfer them to a wire rack and let cool completely before cutting into bars.


Yes, that red strip is beef.

My brother was the first to try. He said they were alright. The beef chunks were like raisins, apparently. lol.


Thursday, February 9, 2012

Iced Sugar Cookies

Here's my initial plan: Bake a batch of cookies, glaze it with glaze icing, bring it to UKM for the meeting, and share it with my friends.

What really happened: I baked a batch of cookies the night before, glazed it this morning but took longer than expected, glaze was too runny as I added too much water, did a handful so I could at least have something to share with my friends, made my way to UKM, got lost on the NPE, ended up in Kuchai Lama, drove a little more and reached Bukit Jalil and finally arrived somewhere familiar - Bandar Kinrara, called friend for help, restarted my journey at the NPE, finally on the right track and reached UKM, wondered in the law fac for a good 10minutes before I realised they were in the lecture hall.

Cookies were alright but I know better on how to handle the glaze icing in future! Dont be so generous with the water!!!
Anyway here is the recipe:

Cookie dough
1 cup butter
1 cup sugar *can be reduced to 1/2 cup!
1 egg
1 1/2 tsp vanilla extract
3 cup flour
1 1/2 tsp baking powder
1/2 tsp salt


1. Cream butter and sugar until light and fluffy. Add in egg and extract and mix.
2. In another bowl, combine flour, baking powder and salt.
3. Slowly add flour mixture to the butter mixture and mix until completely combined.
4. When dough is made, chill for an hour or so. After that, sprinkle flour out and roll and shape dough. But what I did was, (advice given by Our Best Bites) roll out the dough into a sheet and then, only freeze it for like 10minutes. Then quickly cut out the desired shape and place the shaped cookie dough onto the baking tray.
5. Bake at 177C for 8-12 minutes. If you like it soft and chewy, bake it for about 8minutes. If you like it crunchy, bake it longer.

and ta-daaa... you have this. Refer picture below.


Glaze icing
1 1/4 cup icing sugar
3 tbsp milk
3 tbsp honey
1/2 tsp vanilla extract

Combine sugar and milk until smooth and not lumpy. Then stir in honey and vanilla.

Note: This was relatively easy but I messed things up by underestimating the power of milk/liquid. Because the sugar looked very much solid initially when i added the milk, i began to add in more and MORE water, without considering the recipe. That is probably where I went wrong because the icing became quite watery and I ended up adding alot more icing sugar to make up for the liquid. So peeps, if you ever make this, remember to only add any liquids bit by bit!

And you may also add any colouring to your liking. I tried yellow and red. Actually had plans to decorate them according to Valentine's theme but because my icing was runny, I had to do with a simple flower pattern. Do check out the way Our Best Bites decorated their cookies. This was what I originally intended to do. I forgot about the toothpick!!!! Could have decorated the icing using a toothpick. Nvm nvm, next time! I will definitely do this right! on a separate note, it is really therapeutic.

AIC2012 begins tomorrow! Looking forward to meeting lots of new people. Hopefully things will turn out smoothly.

Sunday, February 5, 2012

Cream Puffs

Just in case any of you are wondering if I got my phone back.. yes, I did. I have been told that I am one lucky girl because that doesnt happen very often in today's world. Perhaps.. I was lucky this time. We agreed to meet at IOI bus stop in the morning, she came driving with her kid in the car. She passed me my phone, and as a token of appreciation, I gave her an angpao. Very lucky indeed.

A friend even told me to send my phone to a service centre to check whether a GPS tracker has been installed into my phone. Very thoughtful of him, but I seriously doubt that it is necessary. hmm

Made cream puffs yesterday (before I lost my phone). The puffs were a success but the cream not so.

Puff:
1 cup water
1/2 cup butter
1 cup flour
Salt
4 eggs

1. Preheat oven to 218C.
2. In a medium pot, bring the water and butter to a simmer on medium heat. Add the flour and stir very quickly in one direction. Keep stirring to continue cooking the flour and cook off some of the water, another minute or two.
3. Let the pot cool for a while, until the dough is lukewarm, before adding the salt and eggs one by one into the pot. You dont want the eggs to cook too quickly.
4. Mix rapidly until each egg is combined into the paste. The paste will go from shiny to slippery to sticky. The pâte a choux can be cooked immediately at this point or refrigerated for up to a day until ready to use.
5. Spoon the dough into a piping bag. Pipe onto a baking sheet into little puffs, keeping the puffs 2-inches apart. With wet finger, press down the peaks. Bake at 218C for 10 minutes, then 178C for 18-30 minutes, depending on the size of your puffs.


They turned out better than expected. It was the cream that disappointed me but I guess it was my fault being a newbie and all. There are two usual ways to make the cream. The first being, whipped cream, and the other being making custard cream. Whipped cream will have a lighter, frothier consistency, whereas custard cream is thicker and creamier. I would have made the latter but since whipping cream was available at home, I opted for the former. But.. I forgot about the sugar! oh darn.. the cream puffs turned out to be savoury with some plain cream in between. Was ready to just dispose off the cream puffs but on second consideration, I realised that the cream puffs could do with some simple icing sugar for dusting and they will be just as delicious! heh.

And fortunately, that was the case. Brought it for a friend's steamboat party. Well, the host did say they were awesome! :)

Saturday, January 28, 2012

Spaghetti Dinner


So yea, I made spaghetti for dinner, AGAIN. It's getting pretty easy for me.. preparing the sauce, mincing the meat, boiling the noodles. It's crazy how something so delicious can be so easy to cook right? I wish I could say the same for Chinese cuisines. But too bad, havent gotten the chance to cook chinese, and besides, chinese food just seems that much more daunting. Probably not the time for me to learn yet.. but soon. One day, when I am pushed into the deep end of the pool, I will eventually learn how to swim. Something like that..

Sauce:
1 can of tomato puree
1 whole garlic, chopped finely
2 big onions, sliced
3/4 carrot, cubed
2 tomatoes, cut
Minced pork
Salt
Sugar

Actually I just cook with anything I have in the kitchen. If I had more carrots at home, I might have put more. Add some oil in the sauce pot, and stir fry the onions, garlic, and carrot. Then quickly add in the minced meat. When it is quite ready, pour in the canned puree and tomatoes. Add in salt and sugar to taste.

Noodles:
Boil a pot of hot water. Add a few drops of olive oil into water. Then, add in spaghetti noodles. Cook until soft and 'expanded.' Pour it out and drain water away. According to my dad, dont rinse the noodles with water after that.

Assemble:
When ready to eat, take as much noodles as you want. Add in the cheese. (Parmesan is the norm, but for my family we just love putting mozarella although mozarella is actually for pizza). Then add in some heated sauce. It's delicious!


Been kinda busy handling two societies at the moment. ALSA will be launching quite a lot of projects in the next few months and me, being the secretary have to prepare all the proposals. And I am setting up a new club for Taekwon-do GTF. So excited!!

But to be honest, when it comes to these things.. it only works when you can get the co-operation of everyone. Sorry to say, not everyone can tolerate a dictator. and I believe, I am kinda one of those type of people. I know what I want to do, and I want people to do things my way, quickly and efficiently. I do realise other people have a life outside ALSA or whatsoever club involved, but when you commit to a post, you should give it your all. Not talking about anyone in particular.. but yea. The past few days have made me realise how powerful it is to be able to influence people and get people to co-operate with you. A process of learning I guess. Fingers crossed, the skills I shall acquire and learn throughout the next few months shall be useful for me in the future. Really, truly blessed to be given the opportunity to face such heavy responsibilities, even if at times, I do complain or whine about how difficult or frustrating it can be.


Sunday, October 30, 2011

Fresh Cream Cake with Pineapple and Bananas


Ta-daa... Fresh Cream Cake with pineapple and bananas. It's for my aunt's birthday. Will upload the picture of the interior of the cake pretty soon but kinda feel lazy now. Anyways this is just a simple sponge cake with loads of whipped cream and tropical fruits. haha. But one of the reasons this is a nice cake is because it is light and not too sweet. Will definitely still need to work on the appearance of my fresh cream cakes in the future though.

[Added: These pictures have just been added in]

The interior of the cake.

I have a test tomorrow. Somehow I wonder whether this is a whole new me that has emerged. I dont feel stressed? Well, at least not yet. It's kinda bad. 'Cause I dont feel that urge to study. Somebody kick me!

Anyways, till then. Holidays flew by before my eyes. Didnt think it would go so fast. Seriously will need to plan my holidays better if I dont want to waste anymore precious time.

Thursday, August 18, 2011

Mille Crepe Cake

Just back from the temple. Will be going back there again on Saturday for the Buka Puasa event organised for the Visually and Hearing Impaired. Grateful to my friend who asked me to join them in their volunteer work. You'ld be amazed at how many people who are actually so willing to get out there and volunteer, regardless at the animal shelter, temple or the orphanage. It gives me that satisfaction to know that not all hope is lost with this world. :)

Anyway, I want to share another cake that I made today. The maid is gone, so I had to do all the washing up and trust me, it aint easy. Ugh, reminder not to use so much butter and oil in future 'cause it's such a pain to wash stuff with oil and grease!!! haha. I made a Mille Crepe Cake. Have loved this cake from the first time I ever tried it at Kafe Indulge. Thus far, I know of three places that offer this delightful cake.

1. Kafe Indulge, Kuchai Lama
2. Nadeje, Melaka
3. Food Foundry, S17


I would say Nadeje is the best among the three because of it's wide selection of Mille Crepe cakes. They specialise only in Mille Crepe cakes, and that only. Will definitely go back there the next time I am in Malacca. I was in awe with how creative they were.. there was even a Mille Crepe cake covered with meringue or something?! Second would go to Food Foundry, only because I havent been to Kafe Indulge for a long time. Cant really compare between these two. Kafe Indulge will always have a sentimental value to me, and well, Food Foundry is much more convenient for me since it's just 10 minutes away from home. So yea, both are equally good.

And now, for MY Mille Crepe cake. Wait for it.... hehe. But dont laugh!

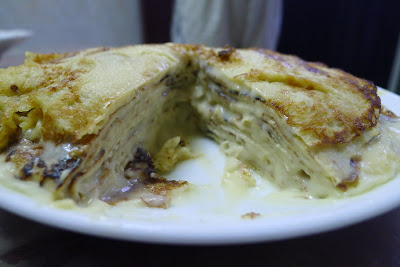
Tadaaa...! Homemade Mille Crepe cake, by me. I feel so proud because this is the second time I am making this and it can be considered a success. Only mistake I made was that I was too generous with the cream so some of the crepes were sliding off. But that asides, the taste of the cream, and thickness (or rather, thinness) of the crepe was just right.

Anyone who wants to try making this special cake should try the recipe from DESSaRTS. It definitely did not let me down. I cant recall where I got my first recipe attempt for this cake but the crepe that time was disappointing. It was too thick in the centre and when the thickness accumulated it resulted in a dome shaped cake. *Disappointed much* This time round, I perfected the crepe part!! :D This is an awesome cake.. I'm going to try to make this cake again pretty soon.


Friday, June 3, 2011

Deep Fried Oreos

Sort of got a little tired of all that baking. Somehow for now, all that greasy-weasy feeling of butter and oil sorts of turns me off baking. Maybe looking for new areas of food to explore..(like nyonya kuihs)? Or maybe i shall just give it a rest for now?

Dumpling festival begins today or begun yesterday, if i am not mistaken. Another year has passed, each year i vowed to learn the art of making it but i always procrastinate another year.

Offhandedly made deep fried oreos 'cause i had to finish off the remaining Oreos before i go off to Perak this weekend. Next weekend might not be here either.. high chance i will be visiting a friend in Melaka. I have acquired a fondness for travelling. It keeps my mind off unnecessary stuff and allows me to live for the moment. No longer do i fret over who said what about me or what that person did to piss me off. I just look forward to what new and exciting things i get to see for the day.

To be frank, I really wanted to go to Medan to volunteer during the period of 13th -27th June 2011. There are so many reasons for me to get away from this life.. but because of the possible dangers that my parents highlighted, i decided not to. *another chance i am allowing to slip away :(*

Anyway, back to the deep fried oreos, my dad and grandma seemed to enjoy it much. Just imagine an oreo enveloped by a pancake! Used the remaining batter to make pancakes with chocolate lava.

Tuesday, May 17, 2011

Successful Mochi!!!

Today, I tried my hands at mochi. Always one of my favourite desserts but not always getting a chance to eat it due to it's price, I was curious to know what went behind this cute little dessert that made it so pricey.

I was pleasantly surprised to discover that mochi is very simple to make, almost as much as it is a delight eating!

Red Bean Mochi Recipe


Red Bean paste:
400g red beans
Water
1 cup sugar
A little oil

For the paste, just boil the beans and water together until it becomes a paste. This usually takes about 45 minutes to 1hour 15 minutes. When it is almost done, add in the sugar and oil. The sugar and oil is actually to make the paste for runny and smooth-looking.

When it is done, leave it to cool and start on the mochi skin.
I got much help and guidance from Apple Pie, Patis, & Pate which gave much explanation on how to make red bean paste from scratch.

Mochi skin:
1 cup glutinous rice flour
1 cup warm water
1/4 cup sugar

I noticed that most of the recipes i looked through required a similar ratio. While not all asked for 1 cup of flour specifically, there was uniformity in the ration. 4:4:1 for flour, water and sugar. It is the perfect ratio and you can make an unlimited amount of mochi with this!

Mix all these three ingredients together. It will be of a runny consistency. Dont start worrying. That is how it is supposed to be.

Microwave for 3 minutes, take it and and mix it. Then, microwave it for another 4 minutes. After this, the consistency should be just perfect for mochi-making!

Flour the surface of your top and start forming mochi balls by putting the filling into the balls.

Chill for a few hours and they are ready to eat! I already ate mine. They were oh-so-good. Aint blowing my own trumpet but.. I could have mistaken them for store bought mochis from Japan!!!